I really wanted to get my parents shirts with their grandkids on them; be it name or picture. I went to a website that had personalization options to add grandkids' names and/or picture. But not only did it end up being a lot of work to get the right picture (you had to have the perfect shot of just their face... and many of my shots are at home, with toys and other kids in the backround), but it was $20 per shirt PLUS shipping. I think the only color was white and I didn't care too much for the designs (options were limited!).
I decided to buy plain shirts ($3.99 a piece) and iron-on letters ($1.99 per sheet). I copied the cute phrase from the previous website "2 Reasons I Love Being a Grandpa" but couldn't find any cute little boy iron-on pictures. I remembered a website I came across recently for skeleton Halloween costumes, found
here. I then decided to attempt to create my own little boy stick figures and put them on the shirt. My creation follows....

I got shirts and iron-on lettersfrom the craft store. We have Hobby Lobby, but sometimes I really miss having a Michaels's! And if you really want to cut down on costs, you can use 40% off coupons to make this project even cheaper.

Arrange the letters on the shirts. I use a ruler as a guide to make sure the letters were centers and lines were equally spaced.
Once you have a row of letters right where you want them, press with a hot, dry iron (specific heat temp should be listed on the letters package, it's seems to always be high though).
Now it's time for the pictures. Since I couldn't find what I had in mind, I opted to design them myself. Freezer paper is drawable on the paper side, and irons on the shiny side. Found with saran wrap OR in sporting. I thought that was weird, but hunters use it for freezing meat I guess. Makes sense... I googled boy stick figure images and free-handed with a sharpie. Use something that leaves a thick line so when you cut the image out, there will be enough space for the paint to make a definite line. Wherever I made a blue line, I will cut out and will paint. Does that make sense?
OK I didn't realize how overly ambitious my cute little stick figure boys were. With the pockets, fingers, extra details of lines here and there, ugh. But still very do-able. Keep all those pieces that get cut out, you'll need them to re-create your image.
Iron the outline image on first. Position exactly where you want it and press with a hot, dry iron. Make sure the edges are pressed down. You want nice, crisp paint lines. Now place those cut out pieces back into the picture; shorts, shirt, hat, face, etc. Whatever you cut out that will re-create what you first drew. I did them one at a time to make sure they were properly placed.
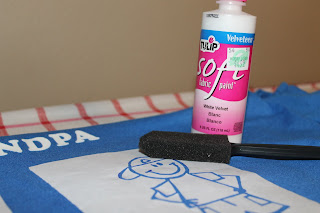
Now it's time to paint. I got textured fabric paint, I didn't know what "textured" meant, but it was the only kind. The skeleton costume website says to use a brush with stiff bristles, so that can be used too. I didn't have one and I didn't want to pay $4 for a whole pack. I had a pack of foam brushed from the dollar store from when we painted our house, and that seemed to work out just fine.
Slide some cardboard under your images, the paint will soak through a bit. Press the paint down, don't do strokes. You don't want any paint to seep under the paper. Do 2 coats. Peel the paper off. You can use your razor to help lift up the edges of the paper. Turn it inside out and slide it oover the ironing board (just the front of the shirt that has the images should be on the board). Quickly press the painted images. The paint may seep through a bit more. This helps seal the paint and puffs the paint up. Ah ha! *lightbulb* "Textured" paint! Now I get it! I love the effect this gives the paint.

I made one for Grandma too. There were some spots here and there that seeped under the paper, or paint peeled up with the paper. I just touched up as needed and it looks great! Exactly what I envisioned! Aside from the paint, which I will use in many more future projects, this project costed me about $8 per shirt. If I would have used my 40% off coupons, I would have saved more money! Or you can print these out off of the computer, trace onto freezer paper, and cut the letters out. My kids' names required lots of E's, A's and N's, so you may need more or less sheets of letters depending on your names. But there you have it, 2 personalized, handmade Christmas gifts.