I've had this several at time at cooking shows for Pampered chef. It's always a hit! What's so great is that they have a section for their recipes. Of course, I often have to modify their recipes. Not only are many things microwaved, but they also call for their own pantry products. But they can still be used pretty easily!
Find the recipe here. I actually BAKE my potatoes in the oven, and cook on the stove. My recipe card says to microwave everything. Do what works for you!
Thursday, October 10, 2013
Rigatoni in Creamy Tomato Sauce
I added some frozen mixed vegetable medley to this at the end and warmed it through. Just to add a little more veggie into the meal. This is excellent with shrimp too! Find it here.
Southwestern Chicken-Pasta Bake
This is delicious! Found it in All You magazine. I think I may add more peppers. It serves 10, so you can freeze half or split it up into 3 meals. Find it here.
Chili Mac Skillet
12 oz ground beef
1 can whole kernel corn, drained
1 can diced tomatoes
1 can kidney beans, rinsed and drained (I used dry beans that I've cooked and frozen in bags)
1 can green chilies
3/4 cup dried elbow macaroni
2 tsp chili powder
1 cup water
1.2 cup shredder cheddar cheese
Brown meat and drain
Stir in corn, undrained tomatoes, beans, chilies, uncooked macaroni, chili powder and water
Bring to a boil. Reduce heat, cover and simmer 12-15 minutes or until pasta is tender
Top with cheese, cover and let stand 5 minutes
Olive Garden Toscana Soup
Another Olive Garden favorite! My husband always orders this soup. We eat it so much, that the restaurant version now tastes different to me. But both are still delicious! Find the recipe here.
Wednesday, October 9, 2013
Beef and Brown Gravy Pasta
Depending on how much you need for your family, you can freeze half of this recipe, or even break it up into 3 meals.
1 1/2 ground beef
olive oil
3 cloves garlic
1 package brown gravy, prepared (which I had a homemade version of this)
1/4 cup parmesan cheese
1/2 cup spaghetti sauce or tomato sauce
1/2 tsp salt and pepper
1 tsp oregano
1/2 rosemary
1 lb cooked penne pasta
Mozzarella or swiss cheese
Preheat oven to 350
Brown beef and garlic in oil, don't drain
Add prepared gravy
Add rest of ingredients and mix
Transfer to casserole dish
Top with cheese
Bake until cheese is melted
Top with
Enchilada Casserole
I really suck at making enchiladas.... they always fall apart! My sister-in-law has informed me that it's because I don't fry my tortillas before rolling them. Too much pressure! I found this casserole style dish via facebook friends.
1 lb ground beef
1 dozen corn tortillas, cut into strips
1 can olives
1 10 oz can cream of chicken (I usually do homemade version, recipe here)
1 chopped onion
2-3 cups shredded cheddar cheese
1 can diced green chilies
2 10 oz cans enchilada sauce
Preheat oven to 350
Brown ground beef
Mix together soup, enchilada sauce, olives, onions and chilies
Add beef, tortillas and half of the cheese
Transfer to casserole dish and bake 45-60 min
Garnish with sour cream and guacamole
Note: I hardly ever have condensed soup, because they're so high in sodium. Plus, homemade is SO delicious! I can eat it by itself! I usually make the creamed chicken, and then add all the ingredients to the pot to mix it up. Brown the beef in a separate pan. The creamed chicken recipe makes more than this recipe requires. So you can measure out what you need and freeze the rest. Or you can cut the recipe down to what you need.
Homemade Cream of Chicken Soup
Since we've tried to eat more real food, many canned items have disappeared from our pantry. Not only is the homemade version better in calories, ingredients and processing... it's delicious! I usually make half of this recipe. Sometimes the recipe I am preparing for only needs yet another half of that. So I can freeze some of it. I guess if you were to logically measure that out, you should be able to get the equivalent of 4 cans of condensed soup out of this recipe. You can always measure 10 oz and freeze them in bags so they're ready to go!
Whenever I make a chicken, I remove all the meat, chop it up and freeze it. Then I use the bones to make chicken stock. For this recipe, I pull out some chicken from the freezer. You can poach some chicken or use leftovers from a rotisserie or something too!
Prepare or have ready 2 cups of chopped/shredded chicken
1/2 stick of butter
1/2 cup flour
2 cups chicken broth
1 1/2 cups milk
Fresh lemon juice
Salt and pepper
Nutmeg
Melt butter in saucepan over medium-low heat
Whisk in flour and cook for 1 minute, whisking constantly
Add broth and whisk until smooth
Add milk and increase heat to bring to a simmer, whisking constantly
Cook for 1 minute then add chicken
Bring to simmer and cook 1 minute more
Remove from heat and add lemon juice, salt and pepper and ground nutmeg to taste.
Cheeseburger Chili Mac & Cheese
This feeds an army! It's a recipe from Rachael Ray. I like mine with mucho beef broth since I freeze it.
Qdoba chicken marinade
Once I discovered Qdoba, I fell in love! Their chicken marinade is amazing. Here is an at-home version.
Mother-in-Law's Crock Pot Taco Soup
Got this recipe from my favorite (and only!) mother-in-law. It's delicious every time! I usually modify the ingredients a little bit to what I have on hand (like regular beans instead of texas ranch style, or a can of chiles and a can of tomatoes instead of Rotel, or ground turkey if I have it). I recently substituted one of the cans of diced tomatoes for crushed, and one can of corn for creamed corn. This makes it a little soupier. But I will post her recipe and you can do with it what you wish!
Combine and do not drain:
2 lbs browned ground beef
2 cans diced tomatoes
2 cans whole kernel corn
1 can rotel
Add:
1 package dry ranch dressing mix
1 package dry taco seasoning
Throw into a crock pot and simmer 4-6 hours. Garnish with cheese, sour cream (or greek yogurt is our favorite!), tortilla chips, etc.
For a freezer meal, I will split the ingredients in half between a gallon freezer bag and the crock pot.
Freezer Meals from The Pioneer Woman
I love the Pioneer Woman on food network! She did a segment on freezer meals so I thought I'd link some of them here. Along with some of her other recipes that I enjoy and also freeze well! She has a lot more freezer meals and tips, check her out!
Beef stew with root vegetables
Homemade chicken and noodle
Sloppy joes
Sour cream noodle bake
Chicken pot pie
Beef stew with root vegetables
Homemade chicken and noodle
Sloppy joes
Sour cream noodle bake
Chicken pot pie
Saturday, June 29, 2013
"Boy" Vinyl Wall Decal

I found this cute wall decal idea on pinterest and thought it was perfect for filling up a big, empty space over the boys' bed. I had found vinyl decals at Hobby Lobby that I liked, but they were more than I wanted to spend. Plus, they were limited in the phrases and fonts.
I wanted something fun for the kids.
Thank goodness for the Cricut! I had a friend that talked about cutting vinyl, and it could stick right onto the wall. I finally went on eBay and bought some sheets of vinyl to try this out. I love it!
Bow and Headband Board

Newborn girl = lots of bows! I had a drawer full of them and needed a way to organize them. I had seen the bow holders that had ribbons hanging down with the bows clipped to them. That style didn't really fit what I was looking for. Plus, I had all these headbands for the bows and headbands with flowers, and they wouldn't go on the ribbon holder. So I went to my trusty DIY site... pinterest!
I've seen these boards before to hold photos, cards, messages, etc. Basically a board covered with fabric and ribbon woven across. Some had little hooks on the bottom to hold the headbands... genius!
I thought about putting the fabric around a piece of plywood, but I ended up finding a spare canvas board. I intended it for a painting project... I brought it home from a moms craft night. I found some girly fabric that would match the nursery (I didn't have enough caterpillar fabric to cover the board. Otherwise, that would have been perfect!). I had tons of ribbon, and left over curtain hooks. I just stapled the back of the fabric and ribbon in place. The ribbon was a little too flimsy for me. When I put bows on, it started to sag. I sewed buttons on where the ribbon crossed, and that helped keep the ribbon in place.
Cost to make a bow board? Free! I was able to used scrap fabric and craft items already in my inventory. I even had extra hanging hardware that I nailed to the back of the canvas board.
It looks perfect!

Wednesday, June 19, 2013
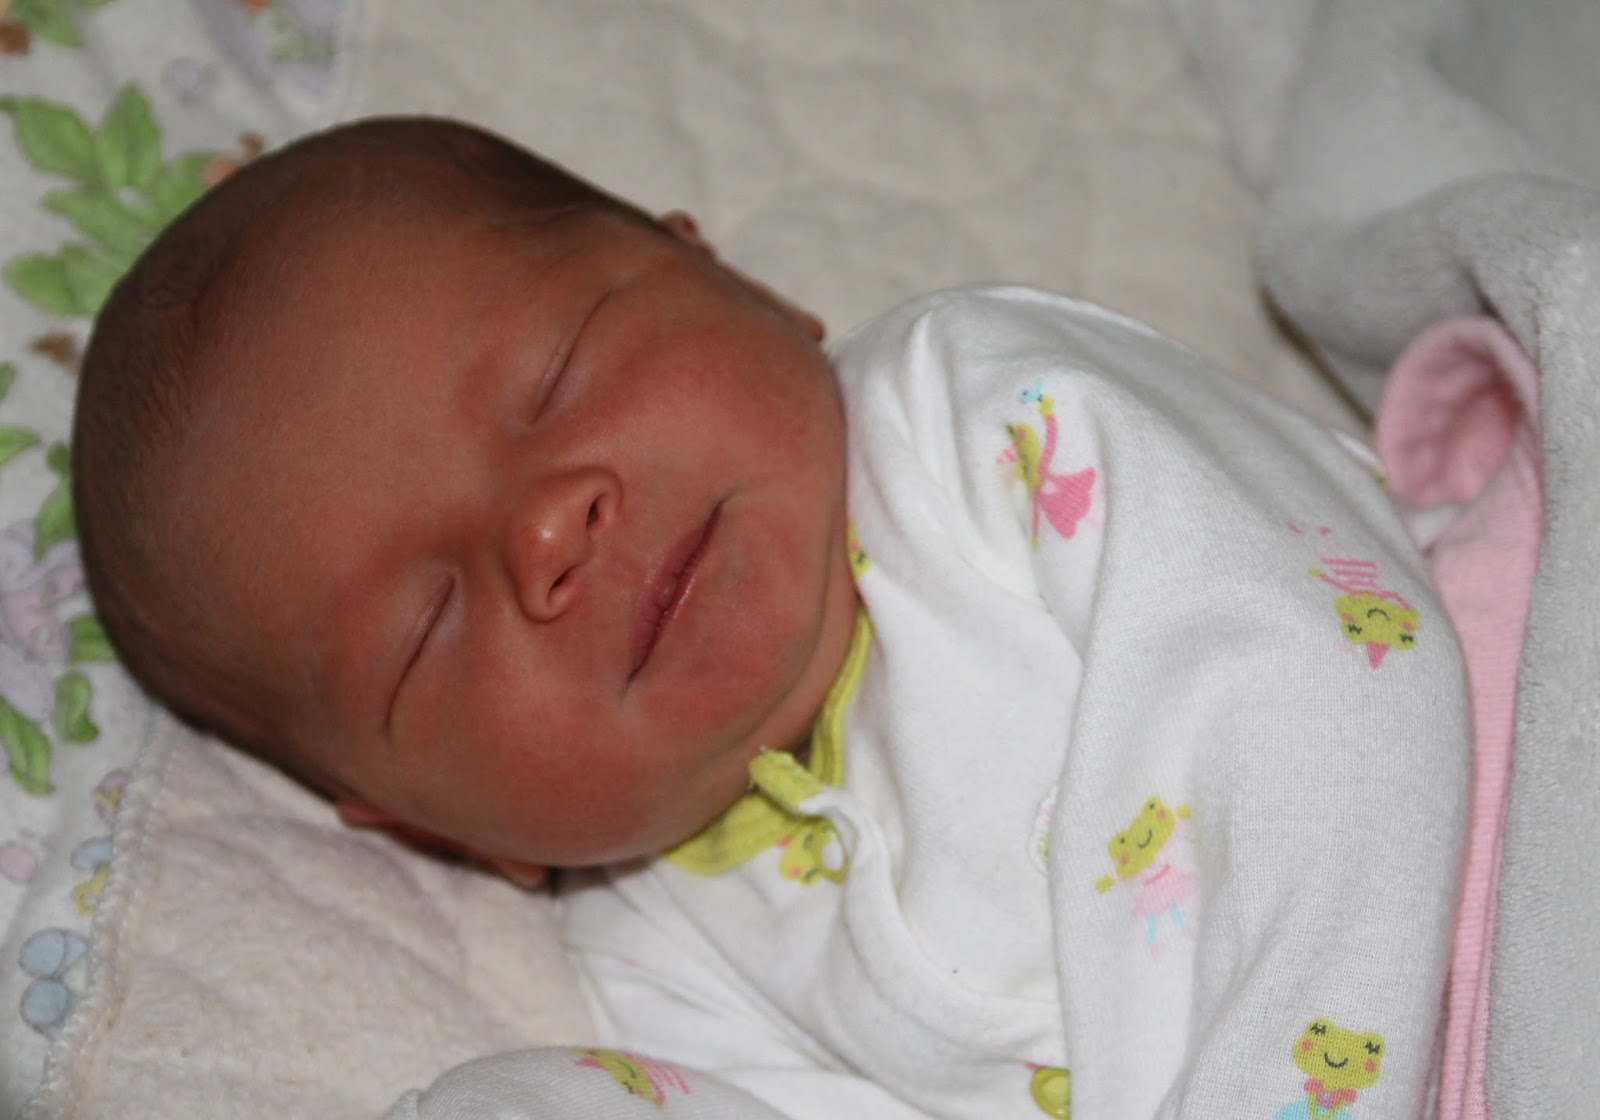
Elina's Unplanned/Planned Home Birth

For some reason, the birth of this baby has been a coming attraction to my family and friends. Maybe it's because we have 2 boys and we were pregnant with a girl?! Whatever the reason, I believe the anticipation has paid off. Not only did she finally arrive, but she arrived with a birth story that seems to only happen in the movies. Here is her story...
After having 2 successful home births with my sons, it was a no-brainer to have a home birth with baby #3. We moved to a new state a couple years ago, and knew we'd have to find a midwife. Little did I know, midwifery has only been legal for a few years in our state. So... finding information and support was very difficult at first. Luckily by the time I got pregnant, I was apart of an awesome moms group that was full of moms from all walks of life; including home birth!
Pregnancy was a bit rocky this time around. We had a scare of a possible miscarriage right away, and decided to keep the pregnancy to ourselves until we got through the first trimester. Taking herbal supplements to help sustain the pregnancy gave me horrible morning sickness. However, once I received great results on my bloodwork at 9 weeks, we were ready to tell our family! But the rest of the world would have to wait :)
We were excited to have another baby, boy or girl. Already having 2 boys, another boy would be easy. We knew how to handle boys, we already had everything boy. But the thought of adding a little girl was exciting! Not just for us, but for our boys as well. Even out the playing field a bit! But we knew that God would give us whatever we needed. At 20 weeks, an ultrasound confirmed it... GIRL!
As excited as we were to have another baby, especially a little girl, I was already over being pregnant. And I had a feeling I would be going all the way, and then some. Both boys were late. Euan, our second son, was 9 days late! So I knew that I would be in for a full pregnancy. As her due date was approaching, everyone was wondering when I would deliver. And of course, everyone had their opinions on how to "make" me go into labor. I've done this before, twice. Nothing works! At least not for me and my babies. I knew she would come when she was ready. You hope it will be sooner rather than later. But I wasn't surprised to watch her due date come and go. I was actually pleased to make it past her due date, since it was on Euan's 3rd birthday! But once that came and went, I was ready for her to come at any time.
I had an appointment 3 days after her due date. I had been having Braxton Hicks contractions for a couple months, but they were now lasting longer. Nothing alarming. Just a very hard belly! In the last day or two, my belly was hard ALL THE TIME! Not painful, just "discomfortable". When the midwife did measurements and checked my belly, she said that it looked like I was getting ready to have a baby. She didn't specificy when (smart woman), but soon. We scheduled an appointment for the following week, but both hoped that I wouldn't make it that long.
I figured it would be at least a few days before baby would come. I never had a feeling of "today being the day" with the other 2. So I really had no idea when this baby would decide to come. I just knew that she was doing her job. She was making me increasing discomfortable. Thus, preparing for her arrival.
I went to bed on the night of my appointment with a pretty consistantly hard belly. It's always difficult to get comfortable at night in the last weeks of pregnancy, so this was really no different. I would wake up about every hour, still tight and discomfortable. Finally around 2 am, I was getting moments of relief... but then I was tightening up again, and this time in my back. For some reason, I kept checking the time. My midwive had just told me about a woman being in false labor in the middle of the night. So maybe that's why I thought I needed to start keeping track of my possible contractions. They were about 10 minutes apart, and not lasting very long. I was able to breathe through them and get a little bit of sleep in between. I tried to breathe quitely so my husband wouldn't be on edge. He had a dental appointment at 8:10, I had to take Euan to his well-child at 8:30 am and his birthday pictures following that. I knew we all needed to get some sleep for our busy day. But with the contractions tightening in my back and belly, I had to get up every few contractions to go to the bathroom. Matthan finally caught on that I was having some issues. I told him what was happening, and we were both anxious to see if this was real labor. But we tried to get some sleep.
By 4:00 am, I wasn't able to quietly breathe through the contractions. It became a little more painful. I thought the time was getting close to call Joann, our midwife. Not because I thought I was going into serious labor any time soon, but just to get her opinion on what we should do next. I was planning on having a water birth, but didn't know when I should get it. Or if I should eat or drink. I was starting to feel weak since I had spent the whole night in and out of bed and making trips to the bathroom. My body was running on empty. I waited until just after 5:00 am to call. She asked if I felt like she needed to come over. I didn't think so.... I asked when the right time was for her to come. She said my contractions needed to be 5 minutes apart and lasting for 1 minute. Then Matthan said my last contraction was 6 minutes apart, then 4 minutes. But they felt like they were only lasting for 30 seconds. So she told me to get something to eat and drink, and call her when I thought she needed to come.
Time - 5:13 am.
I grabbed my stability ball in case I wanted to use it to labor on and headed upstairs. My contractions suddenly seemed to be getting more frequent, but it didn't feel like they were lasting for a whole minute. I grabbed my phone to take with me into the bathroom to see if I could find a stop watch so I could keep better track on my labor.
In this time, Matthan had already went up to get things ready. My niece, Nicole, came a few weeks earlier to stay with us for the summer. Being 17 years old and great with kids, I knew she would be a huge help and blessing to us! She got all my birth supplies out and we tried to get ready. Matthan headed outside to blow up the birthing pool and Nicole asked me if I needed anything. In between trips to the bathroom to labor through contractions, I asked her to make me some oatmeal.
My contractions started coming strongly and I scrolled through my phone to find Joann's number. I was waiting for a chance to call her but I was getting ready to have another contraction. I had an intense feeling of pressure in my back. I thought I needed to go to the bathroom and tried to sit down, but I physically couldn't do it. My legs tensed up and I felt a need to push. With this being my third delivery, I knew the difference between an intense contraction and the urge to push for delivery. But I didn't really think it was time to deliver a baby yet. When I pushed, I saw brownish fluid come out and panicked! I thought, something must be wrong. I didn't feel like it was already time for her to come out. We had just came upstairs 15 minutes ago. There's was no way (in my mind) that I went from managable labor to pushing a baby out in 15 minutes!
People must think I'm crazy for not knowing that I was getting ready to deliver. But I've had 2 babies, and the progression has never been this fast. The first one, my water broke at 11:00 pm and I had painful contractions that were 10 minutes apart all night long. I went into my midwife's house in the morning, had long labor and 2 hours of pushing. He didn't come until after 4:00 pm. The second one, I had contractions in the afternoon. I went in for my check up and was told I was having a baby that night! I went home to labor, got in the tub, went back to my midwife's house in the evening, labored and had him after 9 pm. I felt like I knew the general progressive of labor. And it just couldn't be possible that I escalated so quickly this time.
Flash forward, I yelled for my husband in a panic to get in the bathroom now because I felt like she was coming. Looking back, it's a good thing Nicole was in the house because Matthan was outside running the air compressor to fill up the pool. There's no way he would hear me calling for him. Matthan didn't believe Nicole when she told him I thought the baby was coming. Thankfully, he came in the bathroom and asked me if I was ok. I told him that I thought she was coming out and I was feeling like I needed to push. And the next thing I knew, I pushed her head out. And I was still standing over the toilet! I reached down and felt her head. It was incredible, but frightening. I couldn't believe this was happening like this.
Time - 5:29 am
Matthan must have grabbed my phone off the sink and called Joann right away. Her contact information was the last thing I was looking at, so he was able to call her quickly. I heard him telling her that I was having the baby and her head was already out, and asked her what we were supposed to do. There was no way I was going to walk over to the couch or bed to deliver her. I really thought I was just going to deliver her standing up over the toilet and somehow have to catch her. I heard Matthan say that I needed to get on my hands and knees. I thought, how the heck am I going to get down on the floor with her head already out?! Somehow I managed and I yelled over and over for Matthan to catch her, because she was coming! I pushed out her shoulders, then the rest of her body and immediately praised Jesus! He gave me such strength and control to be able to deliever a baby that way. I was so happy that she was finally here. June 12, 2013. Ms. Elina Jae.

Matthan said she was out, but she was purple, her hand came out with her head and the cord was around her neck. He didn't know if she was breathing. A few seconds later, I heard the most amazing sound... she cried! And because of my rush of hormones at birth, I kept saying she would be fine! Joann told him to flip her over and rub her back to get her to breathe and wrap her in a towel until she got there. She was already on the freeway. We told Nicole to go get the towels downstairs. We hadn't even gotten that far while we were trying to set things up!
 I don't remember how we did it, but somehow we were able to manuver Elina around my legs (since she was still attached to me) so that I could flip over on my back and finally hold her. I laid on the bathroom floor, on top of the garden hose that we were going to use to fill up the pool, and we waited for Joann to arrive. It was quite the scene! It seriously felt like we were in a movie. These things just don't happen! You read crazy stories, watch shows or movies about this, but never actually experience it. Or even know someone that experienced it. It was surreal. I just looked at Matthan and cried tears of joy and disbelief. I said, I can't believe we just did that! I was riding on a high. He was an emotional mess. I guess that's the difference between men and women, fathers and mothers. We tend to get caught up in the joy and excitemeny. They tend to worry about all the things that may go wrong. He was so overwhelmed by everything that happened and just wanted her to be healthy.
 Joann walked in about 20 minutes later. We were all huddled on the floor in the bathroom, surrounding this beautiful bundle of joy! Elina was still attached to me. Joann held her, Matthan held me under my arms, and we all waddled slowly to the couch. Nicole laid a table cloth over it so that I could finish my delivery. I held Elina, Matthan cut the cord, and we were now both in Heaven! Nicole and Joann acted as our photographers and captured first pictures with Elina and candid moments. I can't even begin to express how thankful I am that Nicole was here. She was SUCH an asset in the delivery.
Joann worked on her paperwork for Elina and tried documenting the birth. We had to piece it together, it happened so quickly. We guessed at her birth time, since no one thought to look at the clock! Our estimation - 5:35 am. 3 1/2 hours of labor.


We all stared in amazement at our new addition. Matthan was just about to head downstairs and wake the boys when they so-happened to walk upstairs. Matthan told them their sister was here, and they both ran over to meet her. They could barely contain their excitement! It was perfect. I almost didn't believe that they slept through her delivery, but those kids could sleep through anything! We all had breakfast, including Elina, and looked forward to spending the day at home... getting to know our newest family member. It was so great to have a baby and never have to leave the house. It was pure bliss!
 This story shocks everyone. Not only did it happen so fast that she was delivered on the bathroom floor, but daddy got the pleasure of delivering her. I always said I wanted him to deliver our next baby. I said, all you have to do is catch! I never thought that he would actually do it. But when you're in that moment and minus a midwife, you do what you have to do! I feel so blessed that Elina made it here safely. I'm recovering very well, and she's just a joy! I couldn't ask for anything more.
Saturday, May 18, 2013
Masterpieces, Kids' Art Display

I saw this idea on a friend's pinterest board and thought it was such a great idea to display the kids' art. Before, I was taping it up on the wall, and they would get ripped. I able to make these display rods from curtain rods we were donating to the Goodwill (a couple dollars I think from Lowe's). They were too thin for our heavy curtains, but just perfect for a wide spread of art work! The costly part is buying the curtain clips. I found them in the bath or curtain section, but they were like $7 for a pack of 7. And I wanted at least 2 packs. I will probably add more later...
I saw this "Masterpieces" wall decal on pinterest as well. I was able to cut vinyl with my Cricut and copied the style I pinned. It turned out great!
Thursday, February 28, 2013
Word Launch from LeapFrog; Learn letters, spelling and new words!
I bought this game called Word Launch made by LeapFrog at a garage sale for $5. My kids love LeapFrog and it teaches letters and spelling. So I thought, why not? $5 seems cheap. And it was! You can find them on amazon, found here. You might be able to find them on eBay too.
I hooked it up to the TV and set everything up. I have a 4 year old and a 2 year old. My eldest is well educated on his letters, but learning sounds and word recognition. My 2 year old is learning his letters. A great balance for the both of them!
One thing that I wasn't expecting for them to learn from this game was taking turns. This is SO hard to teach at home. Along with sitting still! You can always tell who has been in preschool when you go to public events and the kids are all sitting "cris-cross-applsauce" and my children are wandering around. And then to have one child go up for an activity and others have to wait in a line and take turns. My kids don't know what to do! I appreciated how this game would tell each player it was their turn.
My kids were sick with a stomach bug so we were stuck in the house for about 10 days! We stayed in our pajamas (hence, my little Buzz Lightyear child), watched movies and played games. The game will prompt the child with each letter, and where to put it in the word placement. The spaces are color coded as well (lots of learning going on!).

He said saying "U like Euan!" Aw, love him!

The letters fit into a colored space and each letter has it's own unique code on the back that links with the game. It will tell you if you have the wrong letter or if it's in the wrong space. Also, which each letter the game will also say the sound.

Once the word in complete, hit the big red button and the game does a little victory dance with the word.

What a great buy of only $5! SO MUCH learning in this one game. And it kept them busy for over an hour.
Leap Pad Case


In the age of technology, kids are so tech savvy at such a young age! Every time we went into the toy section at the store, our oldest son would gravitate towards the Leap Pad (which looks just like an iPad), and he knew EXACTLY how to navigate it! I checked out the games that came with it. Many of them were educational. So we got him a Leap Pad for his 4th birthday.
At first, we got him just one game. Then for Christmas, we bought him a second game. Then we had a problem, what did we do with the little game cartridge when it wasn't in use? It looks like a memory card, and I didn't want it to get stepped on, lost or damaged. I looked up carrying cases online and they were SO expensive (for my taste anyway).
I searched pinterest (LOVE!) for some kind of homemade case and found a tutorial, found here. I was able to use fabric and velcro that I had left over from a blanket I made from a friend. The fabric called for interfacing, and I was like "huh?". But I had some upholstery fabric that I used in placed of it. That was a mistake! It ended up being so thick and stiff. And there'ss many layers to sew through and lots of flipping inside out of fabric. Batting would have sufficed, or a few layers of scrap fabric. The only thing I had to buy was a zipper, .99 cents!
This turned out adorable! It's the perfect size for his Leap Pad and has a pocket in the front to store his games. Perfect for traveling and storing everything!
Valentine's Cards for Kids

I always call myself cheap, but my friends affectionately call me frugal. Whatever you want to call it, it's caused me to be very creative and crafty. I don't like to waste anything, and I especially dislike spedning money on things that are so disposible.
Valentine's day was coming up, and we didn't have any big plans. The kids especially enjoy storytime at the library and they were having a Valentine's day party. Ms. Sherrie suggested bringing cards if we wanted. I thought, "no, I really don't want to go and buy cards for like 4 or 5 friends and throw the rest away". Plus, I didn't want to have to make a special trip to the store to buy them.
Cricut to the rescue! I let the kids pick out their own characters to put on their Valentine's. I looked up some cute Valentine's day phrases and used scrap cardstock that I had in my stash. I have a thick pad of paper for my own scrapbooking endevors, plus all the paper for my etsy store (which can be found here).
Ethan picked the zebra (which HAD to have the flower because that's the way it was in the picture!) And Euan picked the penguin :)
Crochet Headphone Covers

SO!!! Last year we went on a trip and took the DVD player for the kids. At some point we looked back and the foam pieces of the headphone covers were missing. Looked at my 2 year old, and the evidence was in his mouth! He ate them! This was our 3rd pair of "cheap" headphones for the kids, and they are NOT cheap! $5 a pop. They get lost, stepped on, etc. But I was not about to replace these AGAIN!
Searched for some covers to buy or make, and voila! Found these on ravelry.com (my favorite knit and crochet site for patterns!). Was able to make these with some yarn I had on hand and just in time for us to go on vacation. Original pattern by Jennifer Ofenstein, and found on her blog here.
The Very Hungry Caterpillar Quilt

Baby #3 is going to be The Very Hungry Caterpillar theme. I first saw this nursey theme in Pottery Barn and fell in love! But $200 for a quilt?! Yikes! Plus, you need sheets, bumper, decor, etc. Ugh. The boys have twin quilt madras quilt from Pottery Barn and I love them! But they are going to use them for a long time, not just as a toddler. So it was worth spending more. Plus, my mom bought them for birthday presents :)
Andover Fabrics sells Eric Carle fabric. But I wasn't able to find it in local stores or from the manufacturer. Back to etsy! I had to price shop (searched eBay too). I wasn't able to find all the fabrics that I wanted from the same seller, so I had to buy them seperately. But depending on what kinds of fabrics you want, you can save on shipping by buying from the same seller.
The border and backing I got from a local fabric store. They had a very cute green Eric Carle fabric I thought about getting for the backing, but thought I had spent enough! So I got a cute earthy green that I thought would do well as the backing.

I did diagonal stitching for the quilting, but didn't like how much it was bunching. And I didn't want to regret the way it looked. Had to use the seam ripper (which took a couple hours!) and removed the quilt from the machine after each line, smoothed everything out, repinned and sewed another line. It took longer, but was much flatter.
I also wanted to do a blind hand stitch on the binding. This also took a couple of hours, but it looks so much better than top stitching the binding. And I didn't have a blind stich options with my machine. I always forget how to do the machine binding and mitering, but finally found this video on youtube, found here. Machine stitch the binding to the quilt, then flip and press and hand stitch the other side. She talks about how to machine stitch the other side as well. I like to have a continuous border on the binding, and always forget how to do the corners. This video is great!
I love this quilt and have a crib bumper in the works as well! I spent about $50 on the fabric, had batting on hand and about 10 hours of labor (some of that was fixing mistakes!). I even tried looking on etsy to see if I could find quilts for under $200. Not easy, but there were some available. I just had a certain quilt in mind, and thought I could do it for cheaper!
The Very Hungry Caterpillar Burp Cloths

Got a dozen regular cloth diapers from CottonBabies to use as burp cloths, found here. These are $1.75 each and they ship for free! Retail stores often sell cloth diapers too, like BabiesRUs, WalMart and Target. They are Gerber brand. I've heard that they work well as burp cloths, but I know the ones from CottonBabies are diaper service quality and SUPER SOFT! And they are actually cheaper than the gerber ones! You can buy as many or as little as you need.
Bought some caterpillar ribbon off of etsy and sewed it to each end. I did 13" strips, folded and tucked in the ends of the ribbon, and did a top stitch around the ribbon edges. They turned out so cute and will be perfect for new baby!
This would make a great gift too! I bought an extra 3 diapers and am going to make personalized diapers for a friend. I think she'll love them!
Subscribe to:
Posts (Atom)