Showing posts with label present. Show all posts

Monday, February 6, 2012

Homemade Bar Soap


I was given a bar of homemade soap once. It was pumpkin scented and smelled delicious! It had coffee grounds mixed in as an exfoliant, and it felt great! I was shocked when I found out that it was homemade. Buying all the start up ingredients wasn't easy or cheap. The sodium hydroxide (used to make lye, which is used for saponification and makes the soap, soap) had to be ordered online and some of the ingredients weren't carried in the same store, so I had to make multiple stops. But once I had everything, the process was pretty easy. (And once I found a recipe I liked, like the grocery store soap, I could find most everything easily and in the same store.)

The cold process method is what I use. I found the link below to be very useful. It's a great tutorial. It also has a grocery store recipe (which I've used many times), so you can find all the ingredients you need in one place! With the exception of the sodium hydroxide of course. I buy that from http://www.brambleberry.com/default.aspx along with any essential oils. Occasionally I will make a batch of specialty soap. But I dread having to buy extra ingredients and fragrances. I make soap for our everyday use and typically make a simple recipe with coffee grounds and call it good. One batch usually lasts many months.
I did the math and a simple bar of soap is about .50 cents per bar. A specialty bar is over $1 per bar. We usually bought Lever 2000 from Sams (because it was the best price). It's about .42 cents per bar. Just a tiny bit cheaper than homemade, and a lot less work. Store bought soap bars are a little bigger too. But ick! It makes my skin super dried out. And to buy something like Dove or Dial is almost $1 per bar, even from Sams.

I get so freaked out when I hear about the crazy ingredients in everyday things that end up being bad for your health. I know all the ingredients that I put in this soap.

http://candleandsoap.about.com/od/soaprecipes/a/grocerysoap.htm
A great resource is a book called The Soapmakers Companion. It's on my list of things to buy! It has everything you need to know about soapmaking and recipes.

Wednesday, December 28, 2011

Elmo Quilt


I made 2 quilts for Christmas, one for each of my boys. It was my first quilting project. The only thing I am disappointed in is that I didn't flatten and smooth the fabric and batting enough when pinning. So there was a little bunching here and there. Nothing noticable to the average person, but frustrating for perfectionist me!
Euan loves 2 things right now. Cows and "Melmo"! I couldn't find any Elmo only fabric, and I really wanted a life size Elmo blanket. I drew a 3 foot sized Elmo on the red fabric with pencil, using googled images as my inspiration. I used a triple stitch setting (for boldness) and followed my pencil lines. This was Elmo's basic shape. Some lines went jagged, some went a stitch too far, but this totally worked for me. Elmo is fuzzy, so it looked perfect!
I cut out other colored fabric for the eyes, nose and mouth and did an applique technique. But after being washed, Elmo's eyes bled through a little and are now a faded red. Maybe for future projects, double up on the white and prewash the red fabric.
I am so proud of my quilt, even with the mishaps. I was pleasantly surprised with how adorable Elmo turned out! It's better than I had planned!

Cars Quilt


A Christmas present for Ethan. My first attempt at making a quilt. I got the basic instructions here. However.... I did the traditional binding, tedious hand stitiching! I bought the fabric for the front, and used an unused Cars flat sheet for the backing. It wasn't complete by Christmas, just the binding left to complete. But I wrapped it up anyway and finsihed it the next day. Ethan loves it!

Wednesday, December 7, 2011

What will it bee?


My sister-in-law had a "gender reveal" party... something I had never heard of. What a cool idea! Even before she knew what she was having, she picked a bee theme. Good for a boy or a girl. I think diaper cakes are just the cutest things ever! So I wanted to surprised her with a themed cake.
I got the a pizza pan for the tray (Dollar Store), a tall bottle for the frame of the cake (Pelligrino mineral water, WalMart, I think $1.50), ribbon and accents, rubberbands, one pack of newborn diapers. Generic diapers have more in the pack and fills out the cake better. I bought Pampers this time and had some empty spots, but was able to make it look presentable. Roll up the diapers in a rubberband, position a couple rows for the base, wrap with ribbon. Repeat that process for the next 2 teirs. I bought bee fabric, cut out the little bees and adhered them to the cake as an accent. I free-handed the bee on top out of cardstock, using the bee fabric as a guide.
I lucked out when I got to my SIL's house and she had everything set up, but not a big centerpiece. Yay for my cake! The decorations were adorable, it fit in just perfectly!

Monday, December 5, 2011

Dinosaur Shirt


I saw a personalized dinosaur shirt in a catalog and thought it was the cutest thing! But $40 for a tiny shirt?! Get outta here! So I was browsing the shirt-making aisle and my son found these iron-on dinosaur patches (he has recently gotten into dinosaurs). And then it clicked! I was already planning on making some grandparents shirts, why couldn't I make a little dinosaur shirt. Well, the disappointment came... I didn't have enough letters after my grandparents shirts to make my dinosaur shirt. Drat! But I had learned this freezer paper and painting technique.
Type out what you want on the shirt. I used my sons name and the year he was born. I think discovered is dinosaur-y.
Place freezer paper over the print out, and trace the outlines of the letters.
Cut out the letters with a razor. The letters can be disarded, that's where you'll be painting. But the little spaces inside the letters (Like in the A's, R's, O's, etc), keep those so you can iron them onto the shirt along with the cut out.
Place the now stenciled paper onto the shirt. I placed the dino patch on too, just to visualize. But I ironed that on after I painted. Iron the paper down, paying special attention to the edges. You want the edges down so the paint won't seep under the paper. Press the fabric paint onto the letters. Do 2 coats. I was a little anxious to get this project done. Maybe the paint wasn't dry enough, so I ended up with some not-so-crisp edges. But it worked for me. It's a dinosaur shirt!

DIY Grandparents Shirts

I really wanted to get my parents shirts with their grandkids on them; be it name or picture. I went to a website that had personalization options to add grandkids' names and/or picture. But not only did it end up being a lot of work to get the right picture (you had to have the perfect shot of just their face... and many of my shots are at home, with toys and other kids in the backround), but it was $20 per shirt PLUS shipping. I think the only color was white and I didn't care too much for the designs (options were limited!).

I decided to buy plain shirts ($3.99 a piece) and iron-on letters ($1.99 per sheet). I copied the cute phrase from the previous website "2 Reasons I Love Being a Grandpa" but couldn't find any cute little boy iron-on pictures. I remembered a website I came across recently for skeleton Halloween costumes, found here. I then decided to attempt to create my own little boy stick figures and put them on the shirt. My creation follows....
I got shirts and iron-on lettersfrom the craft store. We have Hobby Lobby, but sometimes I really miss having a Michaels's! And if you really want to cut down on costs, you can use 40% off coupons to make this project even cheaper.
Arrange the letters on the shirts. I use a ruler as a guide to make sure the letters were centers and lines were equally spaced.
Once you have a row of letters right where you want them, press with a hot, dry iron (specific heat temp should be listed on the letters package, it's seems to always be high though).
Now it's time for the pictures. Since I couldn't find what I had in mind, I opted to design them myself. Freezer paper is drawable on the paper side, and irons on the shiny side. Found with saran wrap OR in sporting. I thought that was weird, but hunters use it for freezing meat I guess. Makes sense... I googled boy stick figure images and free-handed with a sharpie. Use something that leaves a thick line so when you cut the image out, there will be enough space for the paint to make a definite line. Wherever I made a blue line, I will cut out and will paint. Does that make sense?
OK I didn't realize how overly ambitious my cute little stick figure boys were. With the pockets, fingers, extra details of lines here and there, ugh. But still very do-able. Keep all those pieces that get cut out, you'll need them to re-create your image.
Iron the outline image on first. Position exactly where you want it and press with a hot, dry iron. Make sure the edges are pressed down. You want nice, crisp paint lines. Now place those cut out pieces back into the picture; shorts, shirt, hat, face, etc. Whatever you cut out that will re-create what you first drew. I did them one at a time to make sure they were properly placed.
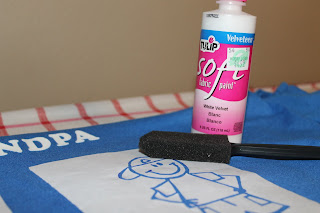
Now it's time to paint. I got textured fabric paint, I didn't know what "textured" meant, but it was the only kind. The skeleton costume website says to use a brush with stiff bristles, so that can be used too. I didn't have one and I didn't want to pay $4 for a whole pack. I had a pack of foam brushed from the dollar store from when we painted our house, and that seemed to work out just fine.
Slide some cardboard under your images, the paint will soak through a bit. Press the paint down, don't do strokes. You don't want any paint to seep under the paper. Do 2 coats. Peel the paper off. You can use your razor to help lift up the edges of the paper. Turn it inside out and slide it oover the ironing board (just the front of the shirt that has the images should be on the board). Quickly press the painted images. The paint may seep through a bit more. This helps seal the paint and puffs the paint up. Ah ha! *lightbulb* "Textured" paint! Now I get it! I love the effect this gives the paint.
I made one for Grandma too. There were some spots here and there that seeped under the paper, or paint peeled up with the paper. I just touched up as needed and it looks great! Exactly what I envisioned! Aside from the paint, which I will use in many more future projects, this project costed me about $8 per shirt. If I would have used my 40% off coupons, I would have saved more money! Or you can print these out off of the computer, trace onto freezer paper, and cut the letters out. My kids' names required lots of E's, A's and N's, so you may need more or less sheets of letters depending on your names. But there you have it, 2 personalized, handmade Christmas gifts.