Showing posts with label do it yourself. Show all posts

Saturday, June 29, 2013

Bow and Headband Board

 
Newborn girl = lots of bows! I had a drawer full of them and needed a way to organize them. I had seen the bow holders that had ribbons hanging down with the bows clipped to them. That style didn't really fit what I was looking for. Plus, I had all these headbands for the bows and headbands with flowers, and they wouldn't go on the ribbon holder. So I went to my trusty DIY site... pinterest!
 
I've seen these boards before to hold photos, cards, messages, etc. Basically a board covered with fabric and ribbon woven across. Some had little hooks on the bottom to hold the headbands... genius!
 
I thought about putting the fabric around a piece of plywood, but I ended up finding a spare canvas board. I intended it for a painting project... I brought it home from a moms craft night. I found some girly fabric that would match the nursery (I didn't have enough caterpillar fabric to cover the board. Otherwise, that would have been perfect!). I had tons of ribbon, and left over curtain hooks. I just stapled the back of the fabric and ribbon in place. The ribbon was a little too flimsy for me. When I put bows on, it started to sag. I sewed buttons on where the ribbon crossed, and that helped keep the ribbon in place.

Cost to make a bow board? Free! I was able to used scrap fabric and craft items already in my inventory. I even had extra hanging hardware that I nailed to the back of the canvas board.
It looks perfect!

Thursday, October 18, 2012

Padded Camera Strap

 
A friend of mine suggested that I put a padded cover on my camera strap. For comfort, and for fashion :) I never heard of such a thing, but it made sense. The strap did sometimes irritate my neck. Plus, it would add some flare to my camera! I bought about a 1/4 of a yard of fabric. There was a decent amount of excess fabric, but it didn't cost much. I probably could've done an 1/8 of a yard. But better to have extra than not enough! Also, I used leftover batting from Christmas quilts.
 
Sandwich the batting inbetween the fabric, folded wrong sides together, and with the fold at the top. It should look like a rectangle. Usually the fabric is about 45 inches wide, so I just folded it down and it was about the length of my strap. I would suggest spray basting, but I didn't have any. I had to pin, and it never came out perfectly flat. But it was good enough for me.

<  Sew lengthwise on both sides. You will be sewing these sides together later, but this will just keep the batting in place as you work with it.

At the bottom, cut the batting a 1/2 inch from the edge. Then fold the edge in and press, with one side of the fabric covering the batting 

Once you fold and press both sides, it will look like this.

Sew on edge down with the batting.

Do a blind stitch to sew it up.

Fold it over your strap for size. Pin and cut excess fabric.

< Sew together and seal with a zigzag stitch. Flip it inside out. Done! Comfortable, fashionable, I love it!


Cat in the Hat Costume Tutorial

I searched on pinterest for costume ideas for the Cat in the Hat. I found a tutorial for the hat, but nothing for the costume. It looked fairly easy though... so I used my favorite costume as inspiration and set off to make a costume.
 
Have I ever mentioned that I can be cheap?! Many put it delicately, and say I tend to be frugal. Whatever the word, I wanted to make these as economically as possible. Using things that I already had or could buy for cheap. I saw costumes at ToysRUs for $30 a piece! And they wouldn't even fit the kids. I used lots of things I already had and bought a few pieces of material and a plain black shirt. I think the total cost of this costume was under $10.
 
Hat
I found a good tutorial on pinterest, which led me here. I changed the color pattern to match the Cat in the Hat book. My son is especially particular on details like that! I couldn't figure out how to attached the hat to the brim. I did something crazy, I'm sure. But it's attached and wearable! On the brim, I cut out a ring that was sandwiched inside the brim. I didn't like how floppy the brim was by itself. I have some mesh plastic canvas (available at the craft store) that I used in a knit hat with a brim. Works great! and it's washable too.
 
Shirt
I didn't have it in me to make a long sleeve shirt. I had plenty of black fabric, but I thought a $3 shirt from WalMart was worth it! I used white felt (from the hat) for the belly. Cut an oval shape for the belly and pin. I did a single stitch around the edge and done. You can probably do a zigzag stitch around the edge too. This will probably launder better.
 
Bow Tie
I'm sorry that I don't have pictures for this part! I did it in parts over the course of a couple of days, sick as a dog, and I just spaced on grabbing some pictures. But here's the jist. I used red felt (from the hat) and free handed a basic bow tie shape. I used the book as a guide. I also free handed the piece of the bow tie hanging down, because I wanted to make that separate and attach it later.
 
I sewed along the outline of my bow tie on 2 pieces of red felt, sandwiching them together. I left one side of the bow tie open so that I could turn the bow tie inside out. Then I did my best attempt of a blind stitch to close it up (felt doesn't iron well). I was being cheap and didn't have red thread, so I used white. I have some parts where the white is showing a little, but it not very noticable. But red thread definitely would have been better!
 
I did the same thing for the piece of the bow tie hanging down, flipped it inside out. I cut out a small strip of the red felt and wrapped it around the center of the bow tie to look like the knot of the bow tie. Hand sew that onto the back of the bow tie. Then hand sew the dangling piece to the back.
 
Hand sew the entire bow to the shirt, and done!
 
Gloves
I think WalMart sells winter knit gloves in the baby section for .99 cents. I can't remember if they had white ones or not... I feel like they did. But Ethan wanted 3-fingered gloves, like the cat. When I looked through the book... sometimes Cat has 3 fingers, sometimes 4, sometimes 5. But Ethan requested 3, so here we go!
 
I had a white t-shirt that my husband let me use for a pair of pants for a different costume. I was able to cut out enough fabric for a pair of gloves too. I outlined another pair of gloves that I already had, just for size guesstimation.

 I pinned 2 pieces of fabric together and cut it out with a thumb, and 2 fingers together on the top. Often in the book, Cat looks like he has a thumb, 3 middle fingers together, and a pinky. But I thought that would be uncomfortable and difficult to put on.

Fold the bottom hem of the gloves twice and sew.

Sew the outline of the glove. Try on for size, and adjust sizing as needed. I needed to sew closer on the fingers. Trim the excess fabric. Get especially close on the inside on the fingers.

Flip inside out, and gloves are done! Not form fitting, but good for show.
 
 
Pants
I used a template here for how to make pants out of an old t-shirt. There isn't a real tutorial on it. Basically you cut out the legs, sew the inner seam (where the crotch is). Then sew each leg shut. Sew an elastic band on the waist and hem the bottom. Pants done!
 
I had to think of a way to have a tail, but still have it comfortable. We plan on going to a couple harvesty events, and I didn't want his tail bothering him while in his car seat. I decided to make it detachable with a button. Sew a button on the back of the pants on the waist band. He doesn't seem bothered by the button. Then you can attach the tail for show.
 
Now buying a $3 pair of Granimal pants from WalMart would have been much easier! But I wanted plain, black pants. Everything has a design or stripe down the side. This wasn't that hard, and made from an old t-shirt.
 
Tail
 

Sew 2 pieces of fabric together, with a rounded end for the tail. This will make a tube. Flip it inside out and stuff it with poly fil.
 
I found out the hard way that the fabric I had on hand would leak of fuzzy pieces of poly fil. So I took all the stuffing out, and put a plastic inside the tail, and then re-stuffed the tail. It's a crunchy-sounding tail now. Oh well! And it doesn't have white fuzz seaping out anymore.
 
Leave the opening of the tail without poly fil. You can do a blind stitch to close it up. I just did a single stitch with the edges folded in to make for a nice seam. His shirts hang over, so you can't really see the stitching anyway. Then sew a button hole to attach the tail to the back of the pants.


Monday, December 5, 2011

Dinosaur Shirt


I saw a personalized dinosaur shirt in a catalog and thought it was the cutest thing! But $40 for a tiny shirt?! Get outta here! So I was browsing the shirt-making aisle and my son found these iron-on dinosaur patches (he has recently gotten into dinosaurs). And then it clicked! I was already planning on making some grandparents shirts, why couldn't I make a little dinosaur shirt. Well, the disappointment came... I didn't have enough letters after my grandparents shirts to make my dinosaur shirt. Drat! But I had learned this freezer paper and painting technique.
Type out what you want on the shirt. I used my sons name and the year he was born. I think discovered is dinosaur-y.
Place freezer paper over the print out, and trace the outlines of the letters.
Cut out the letters with a razor. The letters can be disarded, that's where you'll be painting. But the little spaces inside the letters (Like in the A's, R's, O's, etc), keep those so you can iron them onto the shirt along with the cut out.
Place the now stenciled paper onto the shirt. I placed the dino patch on too, just to visualize. But I ironed that on after I painted. Iron the paper down, paying special attention to the edges. You want the edges down so the paint won't seep under the paper. Press the fabric paint onto the letters. Do 2 coats. I was a little anxious to get this project done. Maybe the paint wasn't dry enough, so I ended up with some not-so-crisp edges. But it worked for me. It's a dinosaur shirt!

DIY Grandparents Shirts

I really wanted to get my parents shirts with their grandkids on them; be it name or picture. I went to a website that had personalization options to add grandkids' names and/or picture. But not only did it end up being a lot of work to get the right picture (you had to have the perfect shot of just their face... and many of my shots are at home, with toys and other kids in the backround), but it was $20 per shirt PLUS shipping. I think the only color was white and I didn't care too much for the designs (options were limited!).

I decided to buy plain shirts ($3.99 a piece) and iron-on letters ($1.99 per sheet). I copied the cute phrase from the previous website "2 Reasons I Love Being a Grandpa" but couldn't find any cute little boy iron-on pictures. I remembered a website I came across recently for skeleton Halloween costumes, found here. I then decided to attempt to create my own little boy stick figures and put them on the shirt. My creation follows....
I got shirts and iron-on lettersfrom the craft store. We have Hobby Lobby, but sometimes I really miss having a Michaels's! And if you really want to cut down on costs, you can use 40% off coupons to make this project even cheaper.
Arrange the letters on the shirts. I use a ruler as a guide to make sure the letters were centers and lines were equally spaced.
Once you have a row of letters right where you want them, press with a hot, dry iron (specific heat temp should be listed on the letters package, it's seems to always be high though).
Now it's time for the pictures. Since I couldn't find what I had in mind, I opted to design them myself. Freezer paper is drawable on the paper side, and irons on the shiny side. Found with saran wrap OR in sporting. I thought that was weird, but hunters use it for freezing meat I guess. Makes sense... I googled boy stick figure images and free-handed with a sharpie. Use something that leaves a thick line so when you cut the image out, there will be enough space for the paint to make a definite line. Wherever I made a blue line, I will cut out and will paint. Does that make sense?
OK I didn't realize how overly ambitious my cute little stick figure boys were. With the pockets, fingers, extra details of lines here and there, ugh. But still very do-able. Keep all those pieces that get cut out, you'll need them to re-create your image.
Iron the outline image on first. Position exactly where you want it and press with a hot, dry iron. Make sure the edges are pressed down. You want nice, crisp paint lines. Now place those cut out pieces back into the picture; shorts, shirt, hat, face, etc. Whatever you cut out that will re-create what you first drew. I did them one at a time to make sure they were properly placed.
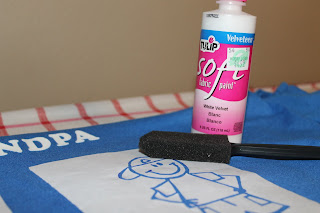
Now it's time to paint. I got textured fabric paint, I didn't know what "textured" meant, but it was the only kind. The skeleton costume website says to use a brush with stiff bristles, so that can be used too. I didn't have one and I didn't want to pay $4 for a whole pack. I had a pack of foam brushed from the dollar store from when we painted our house, and that seemed to work out just fine.
Slide some cardboard under your images, the paint will soak through a bit. Press the paint down, don't do strokes. You don't want any paint to seep under the paper. Do 2 coats. Peel the paper off. You can use your razor to help lift up the edges of the paper. Turn it inside out and slide it oover the ironing board (just the front of the shirt that has the images should be on the board). Quickly press the painted images. The paint may seep through a bit more. This helps seal the paint and puffs the paint up. Ah ha! *lightbulb* "Textured" paint! Now I get it! I love the effect this gives the paint.
I made one for Grandma too. There were some spots here and there that seeped under the paper, or paint peeled up with the paper. I just touched up as needed and it looks great! Exactly what I envisioned! Aside from the paint, which I will use in many more future projects, this project costed me about $8 per shirt. If I would have used my 40% off coupons, I would have saved more money! Or you can print these out off of the computer, trace onto freezer paper, and cut the letters out. My kids' names required lots of E's, A's and N's, so you may need more or less sheets of letters depending on your names. But there you have it, 2 personalized, handmade Christmas gifts.